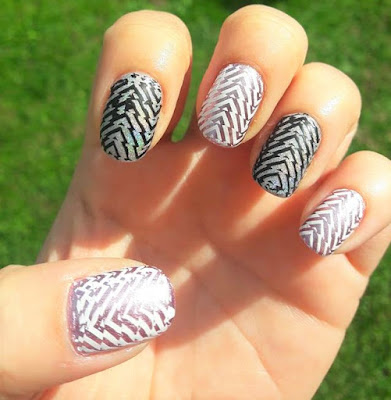
Illusion nail stamping design!
Hello there everyone, so I am back from an unintentional little break from my blog. It's been a little while since I have posted a blog post, I was only going to be taking a week off, but then just kind of lost inspiration a bit for blogging and doing my nails, and so sort of ended up not posting for I think near enough a month, oops. But it was nice to have a little break away from it, as it can all get a bit overwhelming along with all the social media too & personal issues. Anyways, I am back today and wanted to do a nail stamping design, as I haven't done any nail stamping for ages and forgot how much I loved doing it.
Disclaimer-this post contains some affiliate links below, meaning, at no additional cost to you, I will earn a commission if you click through and make a purchase.
After painting my nails at the weekend, (this blog post was going to go up at the start of the week but I have been ill all week) the colours I used inspired me to create some sort of nail stamping look and after looking at the Illusion nail stamping plate no.6 by Moyoulondon, I thought the illusion plate would be perfect for the nail colours. The polishes used were both Nails inc- the purple foil colour called 'Unicorn dot com' & the silver holographic colour called 'Rocket fuel'. It was the silver holographic colour that made me want to do an illusion nail stamping design, as I thought the colour would make a good illusion behind the stamp.
I chose the big arrow illusion stamp, and decided to do alternate colours over the 2 different nail polish colours. Deciding to do the black over the silver, holographic colour and the white over the purple foil. I thought the contrast of different colours with the same illusion stamp would look nice and liked the way they turned out.
 |
| Not my image-taken from amazon website to show the plate! |
As I hadn't done nail stamping in while, I was a little worried that this wouldn't turn out well, as sometimes certain stamps are harder to pick up then others, but was pleasantly surprised at how quick and easy this was to do. This stamp picked up very nicely, with both the black and white nail stamping colours from Moyoulondon, and stamped on very nicely as well. On a couple of nails I did have to add a little extra of the stamp to the nail, but that is only because my nail plate is quite big and wide, and so sometimes the nail stamps aren't quite big enough for my nails, haha!
This was a pretty simple nail design to create, and once you have the hang of doing nail stamping this is quite easy to do. I just painted on a base coat ( Opi natural base coat ), applied 2 coats of the chosen nail colours and applied a top coat ( Seche Vite ), let it dry-it dries pretty fast with that top coat. Then applied the white or black stamping polish over the chosen nail stamp & using my scraper-scraped the polish at a 45 degree angle and rolled the stamper gently on over the stamp, then stamped it onto the nail using a gentle rolling technique. I did all the white stamps then the black stamps. It's weird how the same stamp looks different with the 2 different colours, but I think that is due to how well the colours pick up on the stamper.
Let me know what you think of this Illusion nail design in the comments, makes your eyes go a bit funny doesn't it? Haha! I should be back to posting more regularly again, and I am looking forward to doing lots of Halloween nail designs, which will be coming shortly, so make sure you keep an eye out. And let me know if there are any Halloween/ Autumn nail designs that you would like to see from me in the comments below.
Thank you for visiting my little corner of the web. 😊💜
Don't forget to check out my social media to stay up to date- follow me on Bloglovin, Instagram, Twitter & Facebook. Also now have Pinterest.
Have you seen my last blog post yet? A summery pink rose nail art water decal design!


Comments
Post a Comment