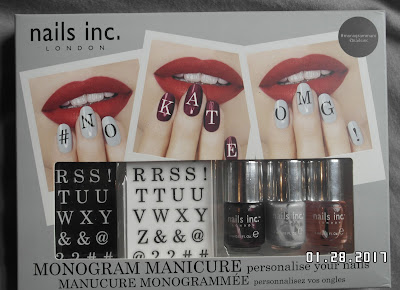
Nails inc Monogram Manicure kit with nail look!
Hello everyone, happy Monday! Hope you all have a lovely week. For today's post I wanted to show you all the Nails inc monogram nail kit that I got for Christmas, along with a nail look I have created with it. I saw this kit and always wanted to try it out but never got round to buying it, so was very grateful when one of my lovely friend's gave me this for Christmas. 😊
This kit is a lovely way to personalise your nails with the monogram nail letters, and looks like fun to use, as you can create whatever you want on the nails.
Included in the kit is-
- 4 sheets of monogram nail letters- 2 sheets in white and 2 sheets in black.
- Mini nail polish of 'The Southbank'- a cool grey nail colour.
- Mini nail polish of 'Mayfair Place'- a deep plum nail colour.
- Mini Kensington Caviar 45 second top coat.
- Cuticle wood stick.
I think this little kit is such a fun way to create something you want to say on the nails, and very handy if you find it hard to write on the nails with nail art pens, as this is a simple way to do it. I love the 2 colours that come with it too and always handy having a mini topcoat too. The only thing I would of loved was maybe some sheets with some numbers on it too but nonetheless it is still a really lovely kit to create some sayings with etc. Also love that on the back of the box it gives you a step by step guide, so it is easy to follow along with.
Let's get to the look I created, I wasn't really to sure what I wanted to write on my nails but decided to do a '#blog' quote, as thought why not aye, haha!
Step 1- Apply one coat of base coat of your choice-today I chose to use Nails inc kale base coat.
Step 2- Follow with 2 coats of chosen colour. As both colours are in the kit, I wanted to use them both to show them on the nails, so I mix up the colours on the nails. Wait 10-15 minutes before applying the letters.
Step 3- Apply chosen letters to nails using the cuticle stick provided, gently remove the letter or symbol from the sheet and position on the nail. Check position of the letter is correct and using your fingers, gently smooth over the letter to firmly fix in place.
Step 4- Finish with 1 coat of the top coat, coat over the letters to seal the design.
What I thought of this kit- love the polishes as usual, as I love nails inc polish. Had a bit of trouble with the grey colour painting on but got there in the end, it was a bit thick in consistency. The letters were easy enough to apply, came of the sheets very easy and placed on nicely on the nails. I will say make sure to place the letter in the right place as they are definitely pretty sticky and when placed they are pretty hard to move. Smoothed down nicely, not much crinkling or bumps, but the only one thing that I found was that I actually preferred how the letters looked before I applied the top coat, as for some reason when I applied the top coat the letters started to go bumpy and lifting a bit, very odd aye. But was very pleased with how easy the letters went on as I have had nail stickers in the past where they are to thick and don't stick properly. Pretty happy with how they look, what do you think?
I also wanted to add something to the nails, so I decided to add a bit of glitter over it afterwards to see what it looked like with glitter, it came out quite nice but if I was to do it again, I would paint glitter first then put the letters on or would do little dots around the letters.
What do you all think of the kit?, have any of you already tried this kit out? What would you create on your nails using this kit? Let me know in the comments below.
Thank you for visiting my little corner of the web. 😊💜
Don't forget to check out my social media to stay up to date- follow me on Bloglovin, Instagram, Twitter & Facebook. Also now have Pinterest.


Comments
Post a Comment